
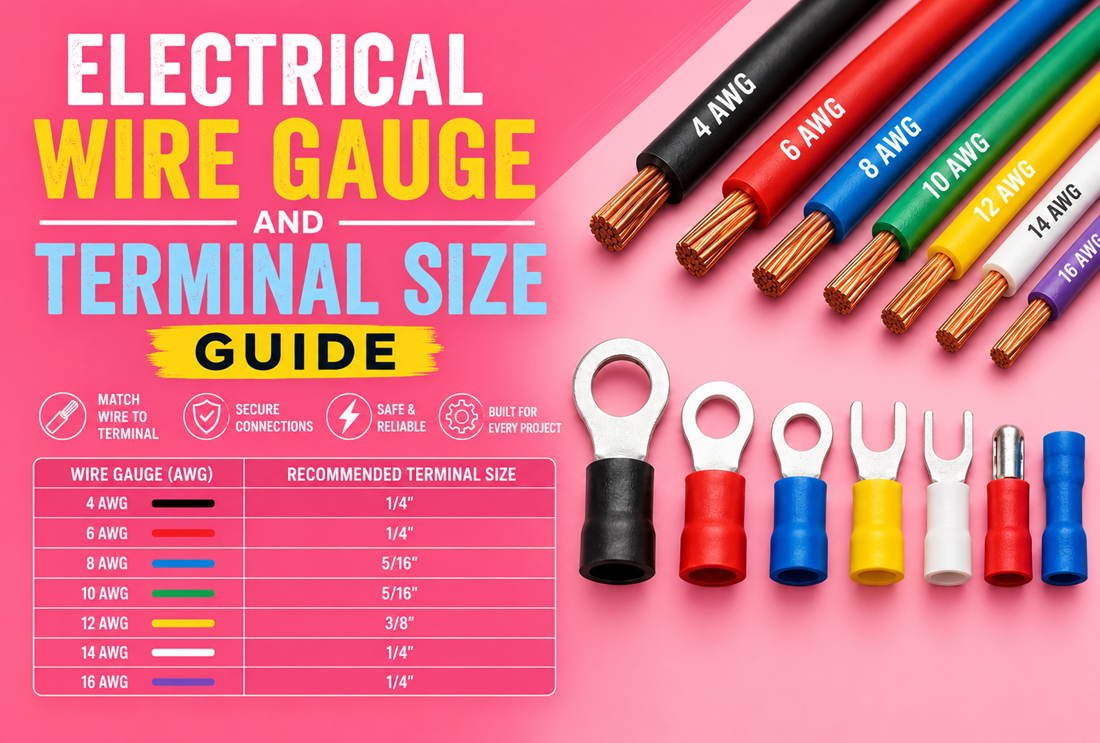
Picking the correct terminal starts with one question: what gauge is your wire? Wire terminal sizes are built around wire gauge, and matching the two is the single most important step in getting a crimp that holds and carries current safely. Use a terminal that’s too big or too small and the connection is weak before you even finish it.
This guide explains what AWG means, how terminal wire ranges work, how to match a terminal to your wire, and how to read the sizing information on terminal packaging. It ends with a selection table, a numbered process for choosing the right size, and the mistakes that trip people up.
Quick answer
- Wire gauge is measured in AWG (American Wire Gauge). A smaller AWG number means a thicker wire.
- Terminals are sold for a range of wire gauges, not a single size, and insulated types often use a red/blue/yellow color code.
- Match the terminal’s rated wire range to your wire gauge. The barrel must grip the conductor firmly.
- Always verify the rated range on the packaging before crimping — exact ranges vary by manufacturer.
What does AWG mean?
AWG stands for American Wire Gauge, the standard system for sizing electrical wire in North America. It describes the diameter of the conductor (the metal, not the insulation).
The system runs backward from what many people expect:
- Smaller AWG number = thicker wire (e.g., 10 AWG is thick).
- Larger AWG number = thinner wire (e.g., 22 AWG is thin).
So 10 AWG wire is much heavier than 18 AWG wire. Thicker wire has more copper, so it can carry more current with less resistance.
Why wire gauge matters
Wire gauge affects three things at once:
- Current capacity — thicker wire safely carries more current. Using wire that’s too thin for the load causes heat.
- Voltage drop — thin wire over a long run loses more voltage, which can starve the device at the end.
- Terminal fit — the terminal must match the conductor’s thickness to grip it properly.
For this guide, the key point is the third one: the terminal you choose has to match the wire’s gauge. The circuit’s required gauge is set by its current and length — that’s a wiring-design decision — but once you know the gauge, terminal selection follows.
How terminal wire ranges work
Terminals aren’t made for one exact gauge. Each is rated for a range of wire sizes — for example, a terminal might accept roughly 16 to 14 AWG. The barrel is sized so any wire in that range fills it enough to crimp securely.
Insulated terminals commonly use a color code to signal their range:
| Sleeve color | Common wire-gauge range* | Rough use |
|---|---|---|
| Red | ~22–16 AWG | Thin wire — small electronics, signal, light-duty |
| Blue | ~16–14 AWG | Mid-range — general 12V and accessory wiring |
| Yellow | ~12–10 AWG | Heavier wire — higher-current circuits |
*These ranges are a common industry convention, not a guaranteed standard. The exact acceptable range depends on the terminal manufacturer. Always confirm the rated range printed on the packaging before crimping.
Notice the ranges can overlap at the edges (for example, 16 AWG sits near the red/blue boundary). When your wire falls in an overlap, size to the thicker conductor you’re joining and confirm it fills the barrel.
How to match terminals to wire
The goal is a barrel that grips all the strands snugly:
- Too large: the wire rattles in the barrel, the crimp can’t compress it fully, and the joint is loose and high-resistance.
- Too small: the wire won’t seat all the way, strands get pushed back or damaged, and the crimp is incomplete.
- Just right: the stripped conductor slides fully into the barrel and fills it, and a proper crimp locks it in place.
If you’re unsure between two sizes, test-fit a stripped wire end in each barrel and pick the one the wire fills without forcing.
Why choosing the wrong terminal size causes problems
A size mismatch shows up as:
- Loose connections that pull out or work free under vibration.
- High resistance at the joint, which wastes power and creates heat.
- Overheating that can damage insulation and nearby components.
- Intermittent faults that are frustrating to diagnose.
None of these are worth the risk when matching sizes takes only a moment.
Insulated vs. non-insulated terminal sizing
Both types are sized by wire-gauge range, but they differ in how you read and use them:
- Insulated terminals carry the color code (red/blue/yellow) as a fast visual cue to their gauge range, plus the printed range on the packaging. The sleeve also sets the tool die you use. See the general category of insulated wire terminals for examples.
- Non-insulated terminals don’t have a color sleeve, so you rely entirely on the stamped size or the packaging’s rated range. They’re common where a separate insulator or heat-shrink covers the joint.
In both cases, the barrel’s internal size — not the sleeve color alone — is what has to match your wire. Treat color as a shortcut and the printed rating as the final word.
Common terminal size ranges
While exact ranges vary by manufacturer, terminals are generally grouped like this:
- Light-duty / small gauge: around 22–16 AWG (often red).
- Medium-duty / general purpose: around 16–14 AWG (often blue).
- Heavy-duty / larger gauge: around 12–10 AWG (often yellow).
- Larger conductors (8 AWG and thicker) use bigger terminals that are typically sized individually rather than by the three-color system.
For ring and spade terminals, you also match a second dimension — the stud-hole size (rings) or fork width (spades) — to your hardware, separate from the wire gauge.
How to read terminal packaging
Terminal packaging usually tells you everything you need:
- Wire gauge range — e.g., “16–14 AWG.” This is the rated range; your wire must fall inside it.
- Color — matches the convention above for insulated types.
- Stud/tab size — for ring terminals, the hole diameter (e.g., #10, 1/4″); for quick-disconnects, the tab width (e.g., 6.3 mm).
- Terminal type and material — ring, spade, butt, etc., and the barrel/sleeve material.
- Piece count — how many are in the pack.
When the packaging and the color code seem to disagree, trust the printed rated range and, when available, the manufacturer’s datasheet.
Terminal selection table
| Your wire gauge (AWG) | Common terminal color* | Typical use |
|---|---|---|
| 22–18 | Red | Small electronics, signal wires, light accessories |
| 16 | Red or Blue (overlap) | Light-to-medium accessory wiring |
| 16–14 | Blue | General 12V wiring, relays, switches |
| 12–10 | Yellow | Higher-current circuits, power feeds |
| 8 and thicker | Sized individually | Battery cables, heavy power runs |
*Color is a common convention only. Always confirm the terminal’s rated wire range on the packaging before crimping.
How to Choose the Right Terminal Size
Follow these steps in order:
- Identify your wire gauge. Check the wire’s jacket printing, or measure/compare against a known gauge. Don’t guess.
- Decide the terminal type you need (ring, spade, quick-disconnect, butt) based on how the connection attaches.
- Match the wire gauge to the terminal’s rated range. Use the color code as a starting point, then read the packaging.
- Match the second dimension if needed — stud-hole size for rings, fork width for spades, tab size for quick-disconnects.
- Test-fit the stripped wire in the barrel. It should fill the barrel and seat fully without forcing.
- Confirm the rated range printed on the packaging matches your wire before you crimp.
- Select the matching crimp tool — a die profile sized for that terminal type and color. A ratcheting crimper gives consistent results.
How to select the correct crimping tool
Sizing the tool goes hand in hand with sizing the terminal:
- Use a crimper made for the terminal type — insulated and non-insulated terminals need different dies.
- Many insulated crimpers have color-coded die slots (red, blue, yellow) that line up with the terminal colors. Match them.
- For larger conductors (8 AWG and up), use a heavy-duty or hydraulic crimper rated for that size.
- A ratcheting tool that releases only when the crimp is complete helps prevent under-crimping.
Practical examples
- Adding a 12V accessory with 16 AWG wire: 16 AWG sits near the red/blue overlap. A blue terminal is a common, safe choice — test-fit to confirm the wire fills the barrel.
- Wiring a small LED with 20 AWG wire: Use a red terminal; blue would be too large to grip the thin conductor.
- Running a power feed with 10 AWG wire: Use a yellow terminal, and match the ring’s stud-hole size to your bolt.
- Repairing a trailer harness with mixed gauges: Identify each wire’s gauge separately — don’t assume one terminal size fits the whole harness.
Common mistakes
- Guessing the wire gauge instead of checking the jacket or measuring.
- Choosing a terminal by color alone without confirming the printed rated range.
- Ignoring the overlap at range boundaries and forcing a poor fit.
- Forgetting the second dimension — wrong stud-hole or tab size even when the gauge is right.
- Mismatching the crimp tool to the terminal type or size.
- Using one terminal size for a whole harness of mixed-gauge wires.
Safety note
Always disconnect power before working on a circuit — never work on energized wiring. Wire gauge selection for a circuit’s current and length is a wiring-design matter; when in doubt, consult a licensed electrician and follow local codes. This guide covers terminal-to-wire sizing and is not a substitute for a specific terminal’s rated specifications.
Frequently asked questions
How do I know what wire gauge I have?
Check the printing on the wire’s insulation, which usually lists the AWG. If it’s unmarked, compare it against a wire of known gauge or measure the conductor with a gauge tool. Avoid guessing, since gauge determines both terminal fit and safe current capacity.
Can one terminal fit more than one wire gauge?
Yes. Terminals are rated for a range (for example, ~16–14 AWG), so several nearby gauges can work as long as the wire fills the barrel. Always confirm your wire falls inside the rated range printed on the packaging.
What do the red, blue, and yellow terminal colors mean?
They’re a common code for wire-gauge range: red for the thinnest wire (~22–16 AWG), blue for the middle (~16–14 AWG), and yellow for heavier wire (~12–10 AWG). It’s a convention, not a guaranteed standard, so verify the rated range on the packaging.
What happens if the terminal is too big for the wire?
The barrel can’t grip the conductor properly. The crimp stays loose, resistance rises, the joint may overheat, and the wire can pull out. Step down to a terminal whose rated range matches your wire.
Does terminal size affect how much current the connection can carry?
Terminal size must match the wire, and the wire gauge is what sets safe current capacity. A mismatched or loose terminal adds resistance and heat. Match the terminal to the correct wire gauge for the circuit and follow the terminal’s rated specifications.
How do I choose the stud-hole size for a ring terminal?
Match it to the diameter of the bolt or stud it will bolt onto (for example #10 or 1/4″). This is separate from the wire-gauge sizing — you match the barrel to the wire and the loop to the hardware.
Conclusion
Wire terminal sizes revolve around wire gauge. Learn to read AWG, understand that terminals cover a rated range rather than a single size, and match the barrel to your conductor every time. Use the color code as a quick guide, confirm the rated range on the packaging, and match any second dimension — stud hole or tab width — to your hardware. Do that, and your crimped connections will fit properly and perform reliably.
Find the right sizes across the Wire Terminals & Connectors range, from insulated spade connectors to butt connectors and mixed assortment kits.